


背景介绍
基于深度学习的图像分类的研究与应用已经进行的如火如荼,对大部分的业务场景来说,更是有着深刻的现实意义 —— 基于图片的互联网分享社交应用,如何借助深度学习在第一时间对用户分享的图片进行实时监测,分类是一个比较典型的应用场景;又例如,电商运营可能希望对所有的产品照片按照产品属性进行自动化分类,减少人工分类的工作;另外,在工业生产线的良品率基于产品图片的自动筛检,以及辅助医疗领域对病理图片的分类等等场景都有着十分广泛的应用前景和实用价值。
汽车型号的图像分类的应用来源于我们真实的客户案例,车辆检测及型号识别广泛应用于物业,交通等的管理场景中。通过在停车场出入口、路口、高速卡口等位置采集的图片数据,对车辆的数量型号等进行识别,可以以较高的效率对车型,数量信息等进行采集。通过采集的数据,在不同的场景中可以辅助不同的业务开展。如商场停车位的规划,路况规划,或者公安系统追踪肇事车辆等等。
在本解决方案中,我们将引入迁移学习的思想。那么什么是迁移学习呢?深度学习中需要大量的数据和计算资源且需花费大量时间来训练模型,但在实际中难以满足这些需求,而使用迁移学习则能有效降低数据量、计算量和计算时间,并能定制在新场景的业务需求,可谓一大利器。迁移学习不是一种算法而是一种机器学习思想,应用到深度学习就是微调(Fine-tune)。通过修改预训练网络模型结构(如修改样本类别输出个数),选择性载入预训练网络模型权重,再用自己的数据集重新训练模型就是微调的基本步骤。 微调能够快速训练好一个模型,用相对较小的数据量,还能达到不错的结果。
本解决方案使用 Amazon SageMaker,它可以帮助开发人员和数据科学家构建、训练和部署 ML 模型。Amazon SageMaker 是一项完全托管的服务,涵盖了 ML 的整个工作流,可以标记和准备数据、选择算法、训练模型、调整和优化模型以便部署、预测和执行操作。同时,本方案基于MXNet, Apache MXNet(孵化)是一个深度学习框架,旨在提高效率和灵活性。它允许您混合符号和命令式编程,以最大限度地提高效率和生产力。
本文会重点介绍在Amazon SageMaker中如何基于MXNet使用自己的数据来微调一个预训练的图像分类模型并且达到较高的准确率来构建一个车型号分类器。
解决方案概览
在此示例中, 我们将使用Amazon SageMaker执行以下操作:
- 环境准备
- 使用Jupyter Notebook下载数据集并将其进行数据预处理
- 使用预训练好的模型镜像进行模型微调
- 将模型进行托管部署
- 调用已部署的模型接口进行在线推理
环境准备
首先,我们需要创建一些使用AWS服务所需的授权和环境。包含三部分: (1)模型训练所需的权限, 这个会自动从创建笔记本的role中自动获取; (2)存储训练数据和模型的S3存储桶 (3)Amazon Sagemaker 中预训练好的图像分类模型docker image
%%time
import boto3
import re
from sagemaker import get_execution_role
from sagemaker.amazon.amazon_estimator import get_image_uri

role = get_execution_role()

bucket='app-cars-classfication' # customize to your bucket

training_image = get_image_uri(boto3.Session().region_name, 'image-classification')
数据预处理
本文使用了斯坦福大学提供的开源数据集cars dataset,该数据集包含了196种不同汽车品牌车型的16185张图片。其中我们将使用8144张作为训练集,8041张作为测试集,每个车型号在训练和测试集中分布均衡。您可以访问该数据集主页查看完整的数据说明和进行下载,示例图片如下

为提高IO效率,不会直接读取图片文件,而是先将图片列表和标签转换为RecordIO格式的二进制文件,训练时就可以顺序读取数据,大大提高了IO速率。MXNet 社区提供了一个很好的图片转换工具 im2rec.py 进行快速图像转换。主要利用的是 MXNet im2rec.py 工具生成 list 和 record 文件,并且按照 validation 的数据和 training 数据的比例进行自动的数据拆分。 具体命令如下图,首先生成标签为 汽车种类个数的 list 文件之后,按照 多个并发线程的方式进行 record 格式转换,并存在定义的目录内。具体转换的shell脚本内容如下,需要注意的是,这里的data_path为此shell脚本的入参,需要自己指定为自己存放数据集的本地路径
#!/usr/bin/env bash
## The process file for image classification data transform to the recordio format
# current directory contains only one zip file

git clone https://github.com/apache/incubator-mxnet.git
source activate amazonei_mxnet_p36
unzip *.zip
mkdir train
mkdir validation

data_path=$1
echo "data_path: ${data_path}"
train_path=train/
echo "train_path: ${train_path}"
val_path=validation/
echo "val_path: ${val_path}"

python incubator-mxnet/tools/im2rec.py \
  --list \
  --train-ratio 0.8 \
  --recursive \
  $data_path/data $data_path

python incubator-mxnet/tools/im2rec.py \
    --resize 224 \
    --center-crop \
    --num-thread 4 \
    $data_path/data $data_path

mv ${data_path}data_train.rec $train_path
mv ${data_path}data_val.rec $val_path
转换结束后,可以看到在train和validation目录中分别生成了两个文件是data_train.rec和data_val.rec, 我们需要将其上传至已创建的S3存储桶内供后续模型训练使用
import os
import boto3


def upload_to_s3(file):
    s3 = boto3.resource('s3')
    data = open(file, "rb")
    key = file
    s3.Bucket(bucket).put_object(Key=key, Body=data)


# caltech-256
s3_train_key = "car_data_sample/train"
s3_validation_key = "car_data_sample/validation"
s3_train = 's3://{}/{}/'.format(bucket, s3_train_key)
s3_validation = 's3://{}/{}/'.format(bucket, s3_validation_key)

upload_to_s3('car_data_sample/train/data_train.rec')

upload_to_s3('car_data_sample/validation/data_val.rec')
使用迁移学习进行模型训练
数据集准备结束之后,我们就可以开始模型的训练了。但在开始训练任务之前, 我们需要配置模型训练的一系列超参数,具体的超参数含义如下:
- Num_layers: 神经网络的层数,本例中可以选择 18, 34, 50, 101, 152 and 200。很多经典网络模型的名字中包含的数字就代表了layer个数,如vgg16中的16就代表了权重层的个数
- Image_shape: 输入图像的通道数,像素的长宽
- Num_training_samples: 训练样本的个数
- Num_classes: 训练样本图像分类的类目数,本例中为了简介,只选取了三个class做范例
- mini_batch_size: 每轮训练的输入一批数据包含的数目
- epochs: 训练轮次
- learning_rate: 训练学习率
- use_pretrained_model: 是否使用预训练模型进行迁移学习,如为1,则初始化中使用已经基于一个较大的开源数据集,如imagenet,学习的网络结构
# The algorithm supports multiple network depth (number of layers). They are 18, 34, 50, 101, 152 and 200
# For this training, we will use 18 layers
num_layers = 18
# we need to specify the input image shape for the training data
image_shape = "3,224,224"
# we also need to specify the number of training samples in the training set
# for caltech it is 15420
num_training_samples = 96
# specify the number of output classes
num_classes = 3
# batch size for training
mini_batch_size =  30
# number of epochs
epochs = 100
# learning rate
learning_rate = 0.01
top_k=2
# Since we are using transfer learning, we set use_pretrained_model to 1 so that weights can be
# initialized with pre-trained weights
use_pretrained_model = 1
之后,我们进行必要的 SageMaker API 的创建,构建对应的训练任务 —— 其中有指定训练的输入与输出,训练的计算实例配置,这里,我们使用的是 ml.p2.xlarge GPU 实例。需要注意的是,这里sagemaker notebook进行本地的数据处理,模型训练,模型推理是不同的环境,可以根据不同的计算任务的需求进行不同的机型选择。
%%time
import time
import boto3
from time import gmtime, strftime


s3 = boto3.client('s3')
# create unique job name
job_name_prefix = 'cars-imageclassification'
timestamp = time.strftime('-%Y-%m-%d-%H-%M-%S', time.gmtime())
job_name = job_name_prefix + timestamp
training_params = \
{
    # specify the training docker image
    "AlgorithmSpecification": {
        "TrainingImage": training_image,
        "TrainingInputMode": "File"
    },
    "RoleArn": role,
    "OutputDataConfig": {
        "S3OutputPath": 's3://{}/{}/output'.format(bucket, job_name_prefix)
    },
    "ResourceConfig": {
        "InstanceCount": 1,
        "InstanceType": "ml.p2.xlarge",
        "VolumeSizeInGB": 50
    },
    "TrainingJobName": job_name,
    "HyperParameters": {
        "image_shape": image_shape,
        "num_layers": str(num_layers),
        "num_training_samples": str(num_training_samples),
        "num_classes": str(num_classes),
        "mini_batch_size": str(mini_batch_size),
        "epochs": str(epochs),
        "learning_rate": str(learning_rate),
        "use_pretrained_model": str(use_pretrained_model)
    },
    "StoppingCondition": {
        "MaxRuntimeInSeconds": 360000
    },
#Training data should be inside a subdirectory called "train"
#Validation data should be inside a subdirectory called "validation"
#The algorithm currently only supports fullyreplicated model (where data is copied onto each machine)
    "InputDataConfig": [
        {
            "ChannelName": "train",
            "DataSource": {
                "S3DataSource": {
                    "S3DataType": "S3Prefix",
                    "S3Uri": s3_train,
                    "S3DataDistributionType": "FullyReplicated"
                }
            },
            "ContentType": "application/x-recordio",
            "CompressionType": "None"
        },
        {
            "ChannelName": "validation",
            "DataSource": {
                "S3DataSource": {
                    "S3DataType": "S3Prefix",
                    "S3Uri": s3_validation,
                    "S3DataDistributionType": "FullyReplicated"
                }
            },
            "ContentType": "application/x-recordio",
            "CompressionType": "None"
        }
    ]
}
print('Training job name: {}'.format(job_name))
print('\nInput Data Location: {}'.format(training_params['InputDataConfig'][0]['DataSource']['S3DataSource']))
到这里,我们就可以直接调用 SageMaker API 来启动训练任务。需要注意的是,我们只是用一个简单的 API- sagemaker.create_training_job 并且根据第三步中的参数配置,就直接可以进行轻松的训练了。中间没有任何的环境构建,部署,甚至是神经网络模型设计的过程。
# create the Amazon SageMaker training job
sagemaker = boto3.client(service_name='sagemaker')
sagemaker.create_training_job(**training_params)

# confirm that the training job has started
status = sagemaker.describe_training_job(TrainingJobName=job_name)['TrainingJobStatus']
print('Training job current status: {}'.format(status))

try:
    # wait for the job to finish and report the ending status
    sagemaker.get_waiter('training_job_completed_or_stopped').wait(TrainingJobName=job_name)
    training_info = sagemaker.describe_training_job(TrainingJobName=job_name)
    status = training_info['TrainingJobStatus']
    print("Training job ended with status: " + status)
except:
    print('Training failed to start')
     # if exception is raised, that means it has failed
    message = sagemaker.describe_training_job(TrainingJobName=job_name)['FailureReason']
    print('Training failed with the following error: {}'.format(message))
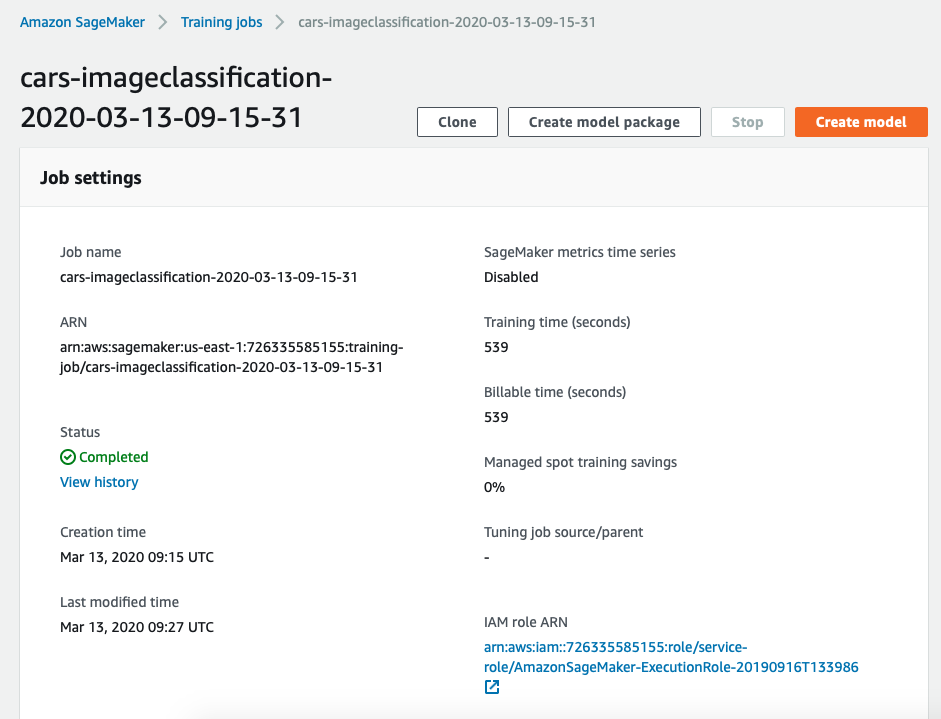
完成上述步骤后,你可以在Sagemaker Console中看到自己的训练任务,当status为completed时,代表训练完成。整个训练过程大概持续15分钟,这个时间会根据你选择的机型和你设置的epochs个数等进行变化。
同时,在训练过程中,您还可以通过监控cloudwatch logs来查看训练过程中的loss变化

模型部署
训练结束后,我们在之前配置的S3存储桶就获得了最新的模型文件。我们接下来,将其进行线上部署,这样就可以通过接受来自客户端的Restful API请求进行预测。
首先,创建模型
%%time
import boto3
from time import gmtime, strftime

sage = boto3.Session().client(service_name='sagemaker')

model_name="cars-imageclassification-" + time.strftime('-%Y-%m-%d-%H-%M-%S', time.gmtime())
print(model_name)
info = sage.describe_training_job(TrainingJobName=job_name)
model_data = info['ModelArtifacts']['S3ModelArtifacts']
print(model_data)

hosting_image = get_image_uri(boto3.Session().region_name, 'image-classification')

primary_container = {
    'Image': hosting_image,
    'ModelDataUrl': model_data,
}

create_model_response = sage.create_model(
    ModelName = model_name,
    ExecutionRoleArn = role,
    PrimaryContainer = primary_container)

print(create_model_response['ModelArn'])
然后,配置接口,可以看到,这里推理使用的实例是’ml.m4.xlarge’
from time import gmtime, strftime

timestamp = time.strftime('-%Y-%m-%d-%H-%M-%S', time.gmtime())
endpoint_config_name = job_name_prefix + '-epc-' + timestamp
endpoint_config_response = sage.create_endpoint_config(
    EndpointConfigName = endpoint_config_name,
    ProductionVariants=[{
        'InstanceType':'ml.m4.xlarge',
        'InitialInstanceCount':1,
        'ModelName':model_name,
        'VariantName':'AllTraffic'}])

print('Endpoint configuration name: {}'.format(endpoint_config_name))
print('Endpoint configuration arn:  {}'.format(endpoint_config_response['EndpointConfigArn']))
第三步,使用上面配置的模型和端口配置创建endpoint,这一步通常需要比较长的时间,一般endpoint的创建需要10分钟左右的时间
%%time
import time

timestamp = time.strftime('-%Y-%m-%d-%H-%M-%S', time.gmtime())
endpoint_name = job_name_prefix + '-ep-' + timestamp
print('Endpoint name: {}'.format(endpoint_name))

endpoint_params = {
    'EndpointName': endpoint_name,
    'EndpointConfigName': endpoint_config_name,
}
endpoint_response = sagemaker.create_endpoint(**endpoint_params)
print('EndpointArn = {}'.format(endpoint_response['EndpointArn']))
在等待端口创建的时候,您可以通过查看端口创建状态来获得创建的状态
# get the status of the endpoint
response = sagemaker.describe_endpoint(EndpointName=endpoint_name)
status = response['EndpointStatus']
print('EndpointStatus = {}'.format(status))
# wait until the status has changed
sagemaker.get_waiter('endpoint_in_service').wait(EndpointName=endpoint_name)
# print the status of the endpoint
endpoint_response = sagemaker.describe_endpoint(EndpointName=endpoint_name)
status = endpoint_response['EndpointStatus']
print('Endpoint creation ended with EndpointStatus = {}'.format(status))
如果当上述的代码运行结果为Endpoint creation ended with EndpointStatus = InService,那么代表以及成功创建了一个endpoint。你也可以通过Sagemaker Console查看到已经创建好的的endpoint。
推理及应用
现在我们使用一个随意挑选的车的图片进行型号的分类。我挑选了一张acura的汽车型号Acura RL Sedan 2012,图片如下

我们直接调用创建的endpoint进行推理,可以看到结果与概率,可以看到,准确的判断出了相对应的分类。这里的概率并不是非常高,但鉴于我们作为范例只训练了不多的epoch,已经是个很不错的结果了。如果你想要得到更高的准确率,请使用完整数据集进行更多轮次的训练。
import json
import numpy as np
with open(file_name, 'rb') as f:
    payload = f.read()
    payload = bytearray(payload)
response = runtime.invoke_endpoint(EndpointName=endpoint_name,
                                   ContentType='application/x-image',
                                   Body=payload)
result = response['Body'].read()
# result will be in json format and convert it to ndarray
result = json.loads(result)
# the result will output the probabilities for all classes
# find the class with maximum probability and print the class index
index = np.argmax(result)
object_categories = ['Acura Integra Type R 2001', 'Acura RL Sedan 2012', 'Acura TL Sedan 2012']
print("Result: label - " + object_categories[index] + ", probability - " + str(result[index]))

以上就是一个完整的使用Amazon Sagemaker构建图像分类模型,训练,部署的过程。您可以将它进行修改,完成不同场景下自己的图像分类任务,同时,我们后续还会推出,使用Sagemaker进行目标检测等不同场景的图像任务应用的实现方式,敬请关注。
参考资料
- Amazon Sagemaker: https://docs.aws.amazon.com/sagemaker/index.html
- GluonCV- Image Classificaiton: https://gluon-cv.mxnet.io/build/examples_classification/index.html